
|
||||||||||||||||||
|
|
||||||||||||||||||
|
| ||||||||||||||||||

| ||||||||||||||||||


The Use of Archaeological Methods
in the Collection of Data Related
to Alleged Sasquatch Activity
- Introduction
- Standardized Terms
- Standardized Methods
- Site Mapping Procedures
- Feature Recording/Mapping Procedures
INTRODUCTION
Data (descriptions and measurements) are the foundation to all scientific inquiry. Investigators of the sasquatch phenomena are attempting to collect hard evidence that can be used to identify physical characteristics of this creature and further the biological understanding of its occurrence and distribution, food habits, gait, territory, habitat, migratory movements, behavior, and area population size. However, to this point, investigators have not had a standardized set of methods or terms for which to gather this data. Our mainstream counterparts have criticized this lack of standardization as being non-scientific. This paper seeks to present standardized methods and terms to aid in the professional collection of data based on widely accepted archaeological methods. These methods can be used to document the spatial distribution of tracks, trackways, beds, shelter sites, nests, scat, hair, rubs, and trails with accurate detailed descriptions.
STANDARDIZED TERMS
- Sasquatch
- A large bipedal primate occupying various environments in North America. Also known as Bigfoot.
- Site
- The geographic place where there is physical evidence of sasquatch activity.
- Feature
- Any object or structure made, modified, or used by a sasquatch that is typically incorporated into the ground, and which cannot be removed from its location without affecting its integrity, such as footprints, nests, rock stacks, broken trees, etc.
- Artifact
- Non-biological portable objects made, modified, or used by a sasquatch. This can include deer bone, sticks, rocks, etc.
- Biological specimens
- Biological remains of or from a sasquatch. This can include dung, hair, blood, bone, etc.
- Ecofact
- Unmodified biological (plant or animal) remains resulting from sasquatch activity (i.e., deer kills, etc.)
- Survey
- A systematic examination of land to document sasquatch activity.
- Site Record
- Written record detailing the site, feature and/or artifact, including location, directions, content, terrain, elevation, and other geographical information. Usually portrayed in part by a site map.
- Site Map
- Detailed sketched depiction of the geographical layout of a site and/or feature.
- Photo Record
- Detailed record of photos taken of the site and/or feature, including compass directions.
- Datum
- Permanent marker from which all measurements and compass directions are taken. Prominent and obvious so it can be relocated later in time.
STANDARDIZED METHODS
Site Recording Tools
Any good data collection first starts with good tools. The following is a list of necessary tools to do the job.
- backpack
- USGS topographic map
- handheld ruler or drafting/engineering scale
- measuring tape (at least 25 meters in length)
- compass with degree demarcations
- plastic bags and/or vials for collection of material
- note pad
- graph paper
- pencils
- 35 mm or digital camera
- film
- rubber or surgical gloves for evidence collection.
Helpful items:
- video camera
- blank tapes
- cassette recorder
- blank cassettes
- altimeter
- GPS unit
Survey Methods
The survey strategy should be designed to insure that the types of landscape comprising each survey area receive an intensity of coverage appropriate to the roughness of terrain, density of vegetation cover, degree of slope, constraints on observation, and expected sasquatch activity, based on witness accounts in adjoining areas.
Intensive survey - Allows the surveyor to encounter the smallest of sasquatch sites likely to occur in an area. The surveyor does not rely on inspection of specific localities on an intuitive basis. Traverses or transects between members of the crew vary between 1-24 meters apart. The transects function as survey corridors for individual team members who walk them in a meandering pattern, closely observing the ground surface and surrounding area. All areas which can be walked are surveyed in this mode. Excluded are areas too steep to safely walk and areas of impenetrable brush. An attempt should be made to cover the entire area using parallel transects. Transects can be marked on a USGS map and should be guided by compass bearings if possible.
Cursory survey - Entails taking random or widely spaced (25-75 meters) transects or traverses through an area. Usually this is caused by dense brush or extremely steep terrain. All possible measures are taken to identify areas which can be inspected in an intensive manner.
Unsurveyed - Areas with precipitously steep slopes and/or dense vegetation where even a cursory survey is not possible or feasible.
Site Recording Methods
Once a site is located, basic descriptive information needs to be recorded. This data needs to be written down at the time of discovery, rather than waiting to get back to the vehicle or home.
Directions to Location ? How did you get here? List what roads you traveled on, how far and in what direction. When you left the car, describe how far you walked and in what direction.
Example: From Sonora, California, travel east of Highway 108 for 23 miles to the town of Strawberry. In the town of Strawberry, turn right on Pinecrest Road, and continue for 1.3 miles. Park at the turnout. Walk due west for one mile to the site.
Environmental Data ? What does the site look like? Describe the vegetation (particularly any edible species), slope, aspect, distance and direction to the closest permanent water source, elevation, and basic landforms (e.g. hilltop, steep mountain slope, valley floor, etc.).
Physical Location (must have USGS Topographic Map) ? Record the exact location of the site. Use Township, Range, Section (to 1/32nd if possible), and either UTMs or Longitude/Latitude. A Geographical Positioning System (GPS) unit would be a useful tool to document this information.
Features ? Describe the feature: material, length, width, thickness (all in metrics), color, shape, and quantity. If a built feature, described method of construction. If the feature are footprints, record the length, width, and depth of each print; entire length of trackway; distance between the heel of left foot to the heel of the next left foot (or right is two of those are present).
Artifacts ? Describe the artifact, material, length, width, thickness, color, shape, and quantity. Photograph all artifacts with a scale in the photo if possible.
Weather ? Describe basic weather and environmental conditions (e.g., raining, six inches of fresh snow on the ground, dry sandy desert, etc.).
Site Mapping Methods
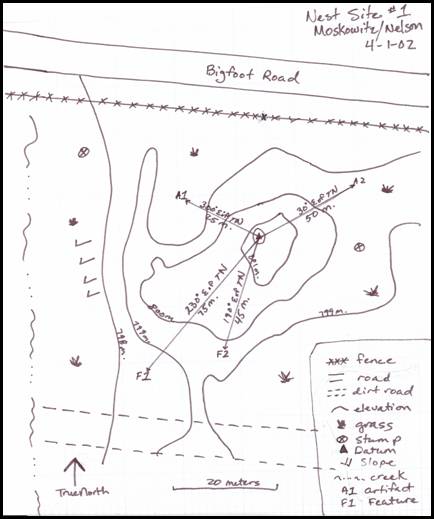
This section is intended to aid in the preparation of site map, which will serve an approximate depiction of a site in the context of its environmental setting. The most important criteria are that the map be clear, legible, and show the relative locations of the cultural and natural features of the site. In general, all materials or environmental features need to be shown.
Any map, to be useful, requires a method of location and measuring (a datum and measurements), a method of orientation (a north arrow), a scale, a legend explaining symbols utilized and an identification of the subject matter(see Figures 1 and 2).
Location and Measurement - Inherent in these concerns are both the location of a key feature (datum) on the site in relation to the larger environment as depicted on a USGS topographic quadrangle and the relationship of other relevant features of the site area to the chosen datum.
Initially, a datum must be established, ideally a prominent, permanent feature on or near the site which is high and open enough to allow observation of most of the site area. Typical data (plural of datum) include a prominent rock, a unique tree, a stationary manmade object (e.g. a building corner, a permanent fence post, etc.). If no adequate landmark is available, a stake or small pile or rock may be used to mark the datum. Secondary datums can be used if necessary for mapping site details.
If a GPS is not available and the recorder is unsure of the exact location of the site on a USGS map, a method of site location called ?back sighting? can be used. Compass bearings are taken from the datum to at least two (and preferably three) prominent geographical features (e.g. mountain peaks in the distance) which are depicted on the USGS map. These bearings and ?target points? should be written near the datum symbol on the site map. The nearer the target points are to the site, the easier future relocation of the datum will be. These bearings allow plotting of an unknown site location on the USGS map. North arrow lines and lines of the same bearings are drawn through the respective target points and the site will be situated where the lines intersect when drawn back from these targets.
With the site datum established, measurements and bearings are then taken from the datum to natural and cultural features of the site to be depicted on the map. The information is entered on the sketch map along radians from the datum, which end in arrows that indicate the direction of the compass sighting and the distance, in meters, to the feature being identified. These radians aid in the relocation of datum even on a map not drawn to scale. Compass bearing are taken by measuring on the compass the number of degrees east of north that the object lies.
North Arrow - Indicate whether true or magnetic north, also indicate on which compass setting (TN or MN) all sightings on the map are made. Be consistent in this choice both on one map and within a series of maps. The top of a map should be oriented towards approximate north.
Scale - A grid scale block need not be included on the field map if distances along bearings are measured to relevant points on the site. The bar scale can be devised latter from this data. In the event that a metric tape is not available, the mapmaker may pace the distance to the item being location, however, the mapmaker?s pace length must be known. Grid paper should be used to make the map as accurate as possible.
Legend - It is best to clearly label all symbols shown on the map in the corner of the sketch (see Figure 3).
Identification - All maps need to have location name, name of mapmaker, and date created located in the upper right hand corner of the map.
Topographic Contours - Although downslope arrows are often used to depict terrain changes, approximate contours can improve the usefulness of the map. Contours can be used in conjunction with downslope arrows or approximate elevation numbers so that trends in the topography shown will be clear. Typically elevation lines are drawn for every meter of elevational change, however, this can be adjusted to suit the terrain of the subject area.
SITE MAPPING PROCEDURES
- Once the site is identified, walk over the entire visible site area, walk the boundaries to determine the extent, measure using metrics, and draw on sketch map.
- Choose paper size large enough and scale small enough to be able to sketch the entire site on a single piece without cramping details of the site area.
- Establish the site datum, ideally at a permanent geographical features, such as a rock outcropping, not necessarily on site but close to the site and so that the entire site is visible from the datum. A secondary datum may be necessary to accomplish this. Tie in this datum to the primary datum by compass bearing and distance.
- From the site datum, shoot in the major features, artifacts, and the path you took to the site (i.e., road, trail, etc.) with a sighting compass. Measure the distance from the datum to the feature or artifact in metric measurements (meters, centimeters, etc.). Measurements can be by tape or if you know, you?re pace. The datum can also be back sighted from each feature and the bearing converted later. Note: When pacing in two features of the same bearing at different distances, pace the distance from Datum to Feature 1 and record it, then pace the distance from Feature 1 to Feature 2 and record separately.
- Sketch in the approximate contour lines.
- All symbols should be clearly labeled on the map or in the legend. Lettering should be aligned to be read from the bottom of the top with the map held in one general direction.
- A general vicinity map, usually a USGS map, should also be attached.
- Enter the identifying site name, name of mapmaker, scale, and date of creation.
Figure 1. Site Sketch Map.
FEATURE RECORDING/MAPPING PROCEDURES
- Once a feature is located, it is important to record specific details on soil type, construction materials, construction methods, approximate age of feature, etc. Closely examine the feature for hairs, bone, teeth, etc.
- Divide the feature into four parts (using a North/South, East/West line), as well as a piece of grid paper.
- Carefully measure the height and width of the feature within each quad and sketch to scale on grid paper.
- Sketch in the individual elements of the feature (each rock, branch, etc.)
- Mark the location of the feature on the main site map.
- All symbols should be clearly labeled on the map or in the legend. Lettering should be aligned to be read from the bottom to the top with the map held in one general direction.
- Enter the identifying site name, feature name, name of mapmaker, scale, and date of creation.
- If possible, collect samples of soil and/or construction material for later reference. Please record this information in the notes section. Place materials in plastic bags labeled with site name, feature number, name of collector, and date of collection.
Figure 2. Feature Sketch Map.
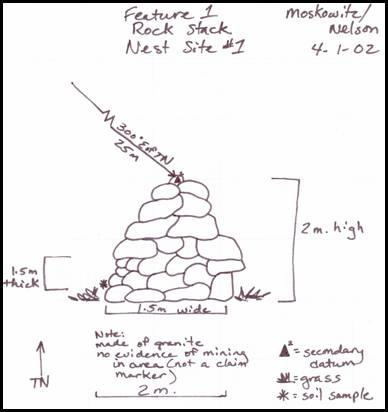
Figure 3. Common Map Symbols.
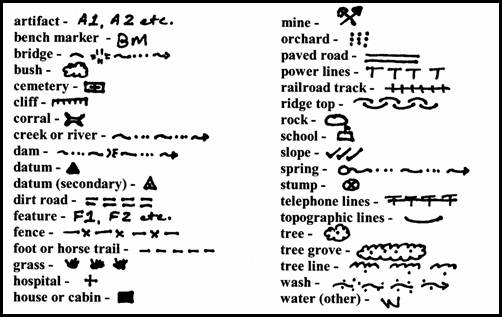
Photo Record
A complete and accurate photo record is a must for any well-documented site. In the field, you may feel that you can tell the difference between photos, but often that distinction is not as obvious once home. A log, detailing each frame, including subject and compass direction, can also help reconstruct the site later on. Figure 4 is an example of how to record the data.
Figure 4. Example of a Photo Record.
|
PHOTO RECORD
|
||||
|
FRAME # |
SUBJECT |
SITE NAME |
COMPASS DIRECTION |
|
|
1 |
View of Feature 1, looking North |
Big Hill Site |
35 degrees TN of datum |
|
|
2 |
View of Feature 2, looking southeast |
Big Hill Site |
75 degrees TN of datum |
|
|
3 |
Overview of site |
Big Hill Site |
170 degrees TN of datum |
|
|
4 |
Close-up/Feature 1 |
Big Hill Site |
35 degrees TN of datum |
|
The Report
The last step in recording a site, feature, and/or artifact is writing the data into a cohesive report for sharing. It does little good to collect data in a scientific manner and then not allow that data to be viewed by peers and/or the public (although the public does not need to know precise location information). The report need not be complex, but rather just a gathering of the facts, a topographic map showing location, and finished, inked sketch maps of the site and features. The author can also add their impressions of likely use of the site, behaviors, size of group, etc. based on the data gathered.
Final Maps
Sketch maps made in the field may contain accurate data (i.e. bearings and distances), however, they often portray the spatial relationships between items inaccurately due to the nuances of human observation. A method for correcting such inaccuracies is to replicate and redraft the field sketch map using the bearing and distance data you obtained in the field. In order to do so, plot the datum on a piece of graph paper with the graph lines representing north-south and east-west. Typically the datum is placed on the graph paper in the same relative position it is located in the field (e.g. if the datum is in the southwest part of the site, put it on the southwest part of the graph paper). Then, choose a scale to represent distance. For example, each meter may be represented by 1/4 inch or whatever the distance is between grids on the graph paper (1/4 inch is popular).
Using a 360 degree protractor with north being aligned with the vertical lines on the graph paper and the center of the protractor located directly over the datum, measure the bearing in degrees to the object from the datum and mark the bearing on the graph paper. For example, if the item was noted in the field as being 38 degrees east of north from the datum, measure 38 degrees on the protractor. Then, remove the protractor and place your ruler or scale so that zero is over the datum and it is in line with the bearing mark just made. Then measure the number of meters out to the object from the datum. For example, if the object was measured in the field as being 20 meters away from the datum, then, using 1/4 inch for each meter, measure 5 inches out from the datum on that bearing (i.e. 1/4 inch times 20 [for each meter] equals 5 inches). In this location, redraw a representation of the item being mapped. Plot all such items, including site boundaries. Typically the initial draft of this final map is done lightly with a pencil and then, for a final map, pertinent pencil lines are remarked with an ink pen.
Additional Information
The methods presented here can also be used to record the efforts to obtain data, such as bait stations or sound blasting. Keeping precise records of where and when these activities occurred will add to the overall picture of the data collection.
Information on how to cast prints or collect specimens such as hair, dung, blood, etc., for scientific analysis is not presented here, but can be found elsewhere on the BFRO site.